Book released – Six Colors")
With regard to iOS 18.2, Apple’s messaging application offers categories to help users sort their mail. Here is what it does, how to refine it and how to deactivate it if you prefer.
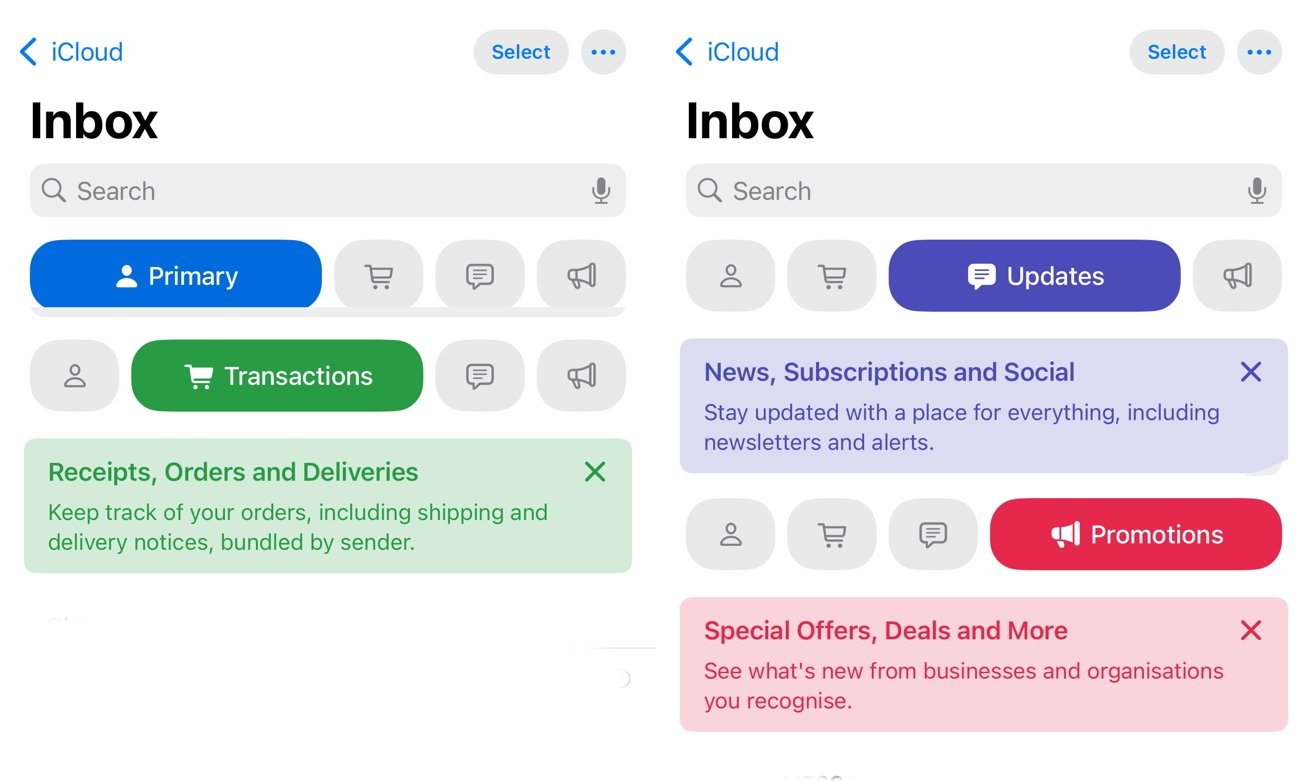
After updating to iOS 18.2 or later, the mail application now categorizes incoming emails in four main categories. These are Primary, transactions, updatesAnd Promotions.
The idea of automatically categorizing incoming emails is to kick Apple for years. The functionality was initially intended to make its debut in iOS 13, but awaited the subsequent development of Apple automatic learning and Apple intelligence features in order to ensure that the work was done on the devices.
According to our experience, the Primary The category works very well. E-mails of people in our contacts, notifications sensitive to time and emails from other people rather than companies tend to be seen here.
Traditionally, the mail also shows the first line or two of an e-mail received. If your iPhone supports Apple Intelligence, time sensitive emails will be at the top and some emails in the Primary The category will now display short summaries of the content.
As before, you can press a given email to open it, or make a half-swipe to the left to choose options, including deletion, signaling or additional tools such as transfer and response. You can also relax right to the right to define a reminder for a given email, or mark not read.
Other categories
In addition to PrimaryThe other categories are Transactions, updatesAnd Promotions. According to our experience, these categories need a little user training in order to achieve their peak of utility.
If your iPhone model supports Apple Intelligence, these other categories – apart from Primary – will bring together all the e-mails of a sender given by default. When you press a given email summary, the most recent message is displayed.
You can also display all messages from a private sender, if their emails are in any one but the Primary category. Press the top or most recent and you get a digest page with the sender details at the top.
This higher section also includes an ellipses icon, which provides tools of which Delete.
This is once a place where you can re-categorize an email, but you can also do it directly from the reception box. Make a half-swipe on the left on an email, press the three buttons icon and press Categorize the sender.
Once you have moved an email to a specific category, all the messages from this private sender will be put in the new category instead.
THE Updates The category is intended for messages from the companies you have authorized to send you an email with their updates of new, or social sites like Facebook, Bluesky and X. It is done, it works well.
THE Promotions The category is the place where mass emails go. Depending on the amount of this type of mail you get, you may have to spend a few minutes mark the mass emails of your community groups and clubs to go to other categories, but again, the mail is Remember your choices and files of future emails correctly.
Turn off the category function
Although this may be very useful – after a little training – some users will prefer not to have the categorization function at all, preferring to browse their incoming email themselves.
Apple made it possible to deactivate the categorization functionality. At the top of the iOS Mail application, there is a menu three points on the right. Press it and change by Categories has List display“And you are back to the way the mail worked previously.
In this menu, you can also choose to turn off Show priority If your iPhone supports Apple Intelligence. When it is not controlled, urgent or time sensitive emails will not increase the summit unless they are the most recent messages.
Alternatively, you can quickly go to the All Mail category. Either press the category currently selected or browse the categories. It is best to use when you want to keep the categorization, but temporarily need to see all your mail in the list.
If you choose to leave the new messaging categorization feature, you can refine how it works via a mail preferences section. To get there, openParametersscroll down to Applicationspress Emailpress Apple Intelligence & SiriAnd turn on or deactivate all the options there.
You can also choose to completely deactivate Apple Intelligence if you wish, assuming your iPhone model supports it. Apple Intelligence’s features appear only on the iPhone 15 Pro and iPhone 15 Pro Max, or iPhone 16 models or later.
To do this, open the Parameters application, scroll down until you see a Apple Intelligence & Siri category, press and turn off Apple Intelligence. You will not see this category at all if your iPhone does not support Apple Intelligence’s features.
The investigations taken early in the deployment of Apple Intelligence revealed that many users do not yet consider the suite of features as important to them. This is likely to change as other updates – including a well -improved SIRI – take place in 2025.